Wednesday, 9 April 2014

Line Brown & Cony Easter Bento

I finally started making Easter bentos this week. I still have a backlog of foodart to be posted, but I'll share all my Easter creations first instead.

IMG_3851
I made a Brown and Cony Easter bento or my boys' lunch yesterday. Actually there's only Brown in the bento, he's pretending to be Cony by wearing a Cony hat, lol. -_-

IMG_3855
Ingredients used to make Brown were rice (brown portion coloured with dark soya sauce), nori and ham. Sides packed in the beno were carrot meat patties, stir fried pea sprouts, quail eggs and strawberries.

IMG_3858
The Easter eggs were hard boiled quail eggs coloured naturally by soaking them in coloured water. Yellow, blue and red eggs were soaked in water coloured using tumeric, butterfly pea flower and beetroot respectively.

Bunting---Dots-and-Stripes---Rainbow---11
Where to get same or similar items used in today's post:
Tuesday, 8 April 2014

Pink Bunny Bread

The bunny bread I'm sharing today was made quite a while ago. I was lazy to sort through the recipe, which is why I did not update it earlier. I decided to get the recipe updated today, as I thought these pink bunnies bread would be great for the upcoming Easter. I will start sharing Easter bentos tomorrow, meanwhile, you can check out all my past Easter creations HERE.

IMG_3025
Pink bunny bread served for breakfast. This set is actually mine, my boys were already eating theirs.

IMG_3027
I used red yeast rice powder to make the bread pink. If you can't get hold of it, you can simply use some pink food colouring gel to colour your bread dough instead. Or you can just make white bunnies too.

IMG_3032
I love eggs and sausages for breakfast. :)

IMG_3018
I used back the Japanese milk bun bear recipe for this.

RED YEAST RICE PINK BUNNY RECIPE

Ingredients:
Bread Flour 250g
Red Yeast Rice Powder, around 5g
Instant Yeast 3g
Milk 200g
Sugar 10g
Butter 10g
Salt 3g

Method:
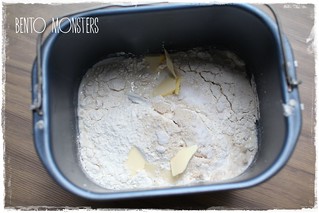
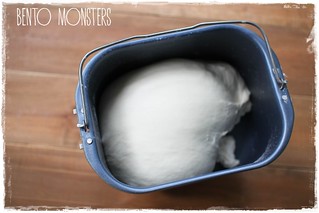
  1. Mix all the ingredients, except butter and red yeast rice powder, in a large bowl to get a dough. Add in butter and knead until dough is springy and soft, this takes around 10 minutes. If you have a bread maker, you can just use the dough function for this step, as well as step 2. 
  2. IMG_1925
  3. Cover the dough with cling wrap and keep in a warm place for it to rise. This takes around an hour and the dough should double in size. 
  4. IMG_1792
  5. Dust your work table with some flour, place dough on it. Punch out the air from the dough with your fist. 
  6. IMG_1794
  7. Mix in red yeast powder, adding a little at a time till you get a pink dough. Divide dough into four portions, roll out and shape them into balls. (I kept half of the dough white because I was not sure if the pink bunnies would turn out well, I made some white bunnies just in case). Cover dough with cling wrap and let it rest for 5 minutes.
  8. IMG_2998
  9. If you are shaping a full size bunny, divide each dough into 8 parts for the head, body, ears, hands and legs, as shown in the picture below. Roll them out and shape them into a ball.  Cover with cling wrap and let the dough rest for 10 minutes.
  10. IMG_2999
  11. Roll out bread dough and shape them again, place them on a baking tray lined with parchment paper. Cover with cling wrap and let dough rise for 40 minutes.
  12. IMG_3000
  13. Preheat oven to 190 degrees celcius, turn it down to 140 degrees before placing in the bread at middle rack. Bake for around 15 minutes. Add in details using chocolate. I used a food marker to draw the blusher for the cheeks.
  14. IMG_3020
 Notes:
  • As an added precaution to prevent the buns from turning brown, you can also place in an aluminium sheet to cover them halfway through baking.
  • If you cannot find red yeast powder, you can substitute with pink food gel colouring.
Bunting---Dots-and-Stripes---Rainbow---13
Where to get same or similar item used in today's post:

Monday, 7 April 2014

Cat Rice Donut Bento

Do you remember the animal donuts I shared about sometime back? You can click HERE to check out that post. That reminds me that I still have donuts pictures and more cute food pictures not shared from my Japan trip last December. -_-

IMG_3379
This time, instead of making donuts, I shaped the rice into donuts and decorated them as kitties. Blue and pink kitties were made using rice mixed with deco furi, whereas brown kitty was made using rice mixed with dark soya sauce.

IMG_3370
Served the rice with oden. There were more food but I have yet to cook them at the time of photo taking. I was trying to get a picture out before I leave to fetch LT, as it's usually rather dark after he's back from school.

IMG_3375
Can you spot the paw prints on the kitties?
Bunting---Dots-and-Stripes---Rainbow---13
Where to get same or similar items used in today's post:

Friday, 4 April 2014

Pooh, Tigger, Piglet & Eeyore Tsum Tsum

TSUM TSUM is a plush toy that is sold in Disney stores in Japan. There are TSUM TSUM plush toys for most of the Disney characters. The soft toys are really kawaii, somehow Japanese just have this talent to make everything extra cute. TSUM TSUM also has a game you can download and play on your phone/tablet.

IMG_3579
TSUM TSUM has been on my to do list for sometime. I decided to start off with making Pooh and friends first. Will continue to make more characters, after I get some Easter bentos done.

IMG_3577
These onigiri are mini versions and my favourite out of the four is Eeyore.

IMG_3573
From left to right, Pooh Bear, Tigger, Piglet and Eeyore. Tigger, Piglet and Eeyore were coloured using deco furi, Pooh Bear was coloured using mashed egg yolk. Other ingredients used to make these were crabstick, nori and ham. Oops, just realised much later, after my boys ate the onigiri, that I forgot to add on the stripes for Tigger. -_-

IMG_3582
Here's an idea how you can pack them into your bento. :)

IMG_3597
It's mini sized, held in my palms for you to see.

collage8
I only did a tutorial to make Pooh Bear Tsum Tsum, details below.

IMG_3585
First, mix in mashed hard boiled egg yolk to your rice. You can add in a pinch of salt if you like, suppose to be tastier this way. I usually omit since my boys have no complains about the egg yolk rice. Alternatively, you can also colour your rice using yellow deco furi, sold at Daiso and Meidi-ya.

IMG_3586
Using cling wrap, mould an oval rice ball and two small round balls for Pooh Bear's head and ears respectively.

IMG_3589
Remove the top red strip of cooked crabstick using a toothpick. Trim/cut away the excess portion.

IMG_3590
Wrap crabstick around the oval rice ball and wrap with cling wrap to secure.

IMG_3591
Add on Pooh's ears using pasta.

IMG_3592
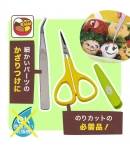
I used this puncher for Pooh's eyes, the rest were cut out using a pair of sharp tipped scissors.

IMG_3601
If you find it difficult to trim nori into small pieces, you can make a bigger Pooh, it's much easier to trim bigger pieces of nori. :)
Bunting---Dots-and-Stripes---Rainbow---11
Where to get same or similar item used in today's post:

Thursday, 3 April 2014

Teddy Bear Bento

Another busy week, can't believe it's Thursday already, and I still have so much stuff not accomplished for the week. -_-

IMG_3163
This teddy bear bento was inspired by the little bear figurine on the left. I've quite a collection of such figurines. I started a little garden in my patio recently, and I brought all of them out to decorate my garden. I've never had green fingers though, I hope my plants will be able to survive under my care, lol.

IMG_3165
Teddy bear was made from rice mixed with some dark soya sauce and nori. The orange scarf around his neck was cut out from egg sheet.

IMG_3166
A closer look at teddy. :)
Bunting---Dots-and-Stripes---Rainbow---11
Where to get same or similar items used in today's post:

Tuesday, 1 April 2014

Kiiroitori Fried Pumpkin Ball

I'm sharing a dessert, fried pumpkin balls, made them just before the one week break.

IMG_3413
These fried pumpkin balls were made using the recipe shared by 婉婉下午茶. If you are interested to make some, you can hop over to her blog for the recipe and step-by-step pictures. :)

IMG_3421
I made my pumpkin balls into Kiiroitori, Rilakkuma's chick friend. :) I stuffed my pumpkin balls with red bean paste instead of nian gao (Chinese New Year cake), simply because I had no nian gao at home but I had a pack of red bean paste I wanted to clear. They turned out pretty good too, although I think the melt in the mouth nian gao would have been even better!

IMG_3426
These were pretty addictive, have to stop myself from popping all into my mouth, lol.
 
↑