Saturday 31 October 2015

Minion Somen & Toast

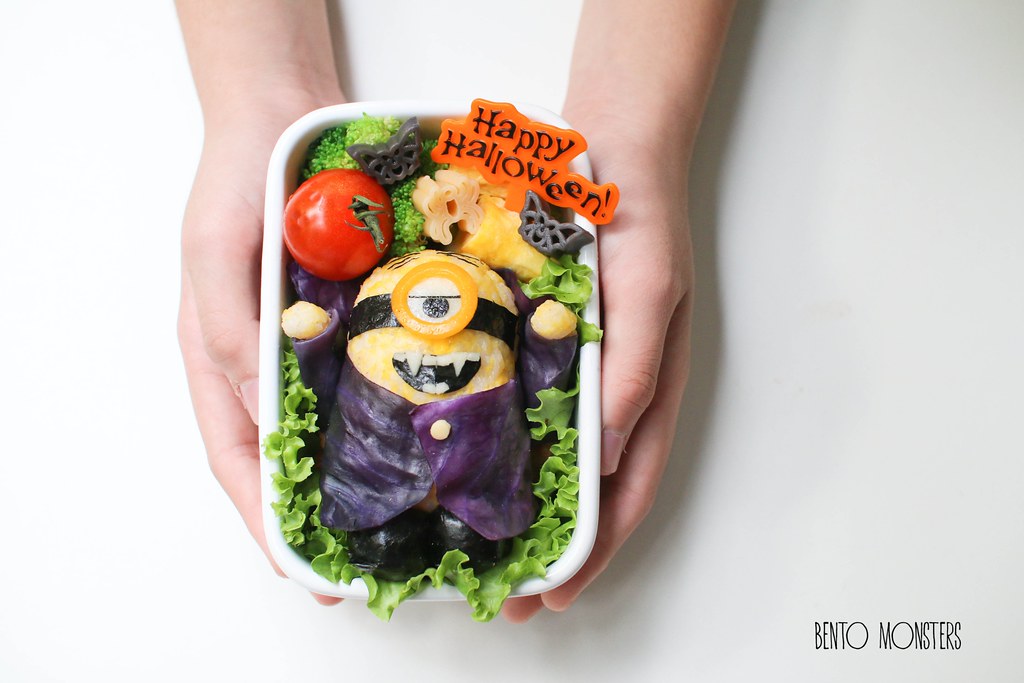
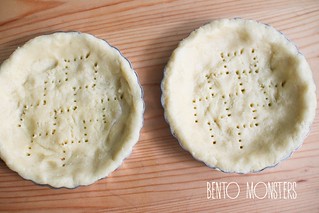
We are still stuck at home this weekend again, except for going out for their enrichment classes and our meals. IT still has Higher Chinese paper next week, it is not stressful for me though, as I don't have high expectations for this paper. I don't mind him dropping off this paper if his results are bad, but so far he has been doing better in this than his normal Chinese paper, it bewilders me too, lol. I rather he ace his normal Chinese paper instead. Since I've time at home, I'm trying to get a few draft posts up and hopefully I can clear more of my backlog.

IMG_7352
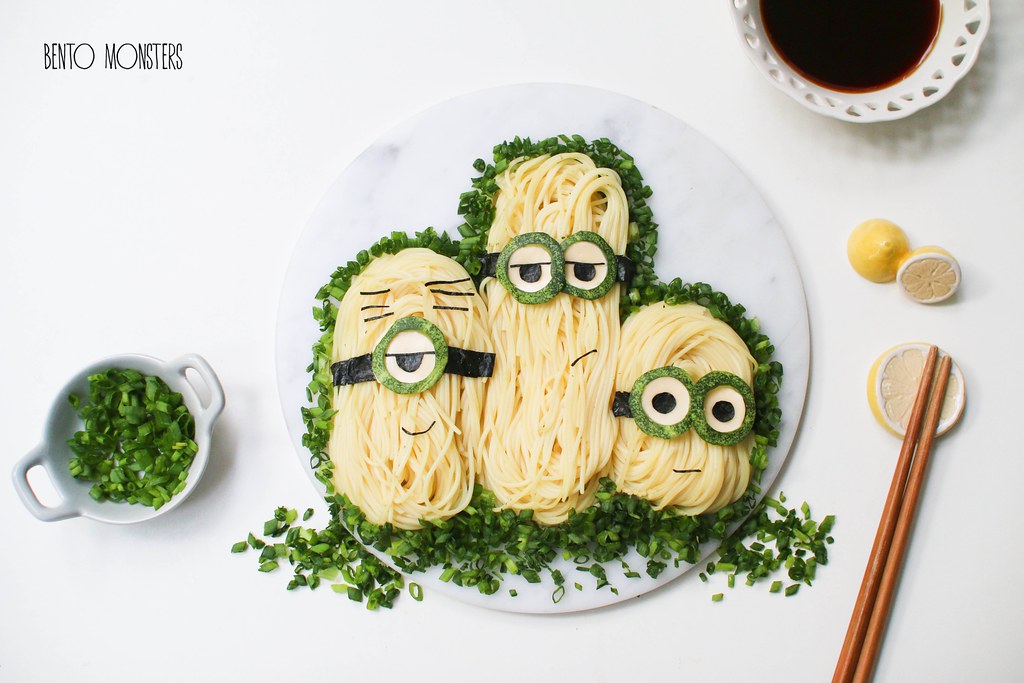
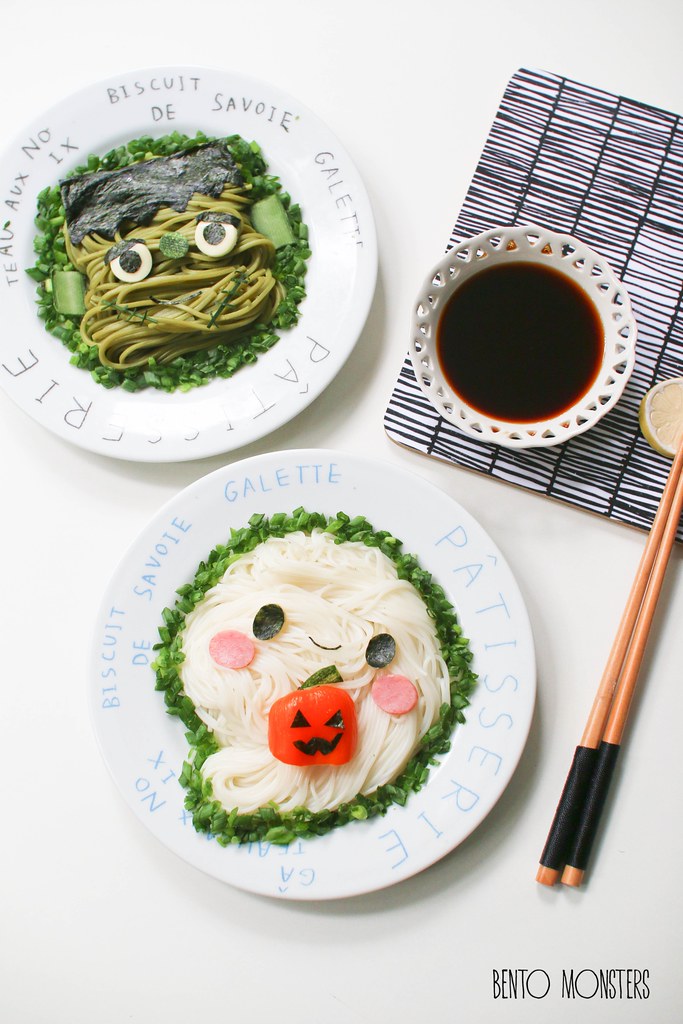
Back to making some noodles food art after a hiatus, because I have not been cooking soba or somen for sometime. I don't know exactly why too, I just did not feel like cooking them. It was only when LT asked me to cook cold noodles again, I begun making them recently. I love how this Minions somen turned out,  sometimes they don't turn out the way I visualise it, but this is one of those that turned out exactly like what I had in mind.

IMG_7346
I've mentioned it before, I love how easy and fast it is to create noodles food art. I've not done any tutorial on how I made this, but you can take a look at two of my past noodles food art tutorial. I did a tutorial on how I did My Melody and sheep using noodles before.

IMG_7350
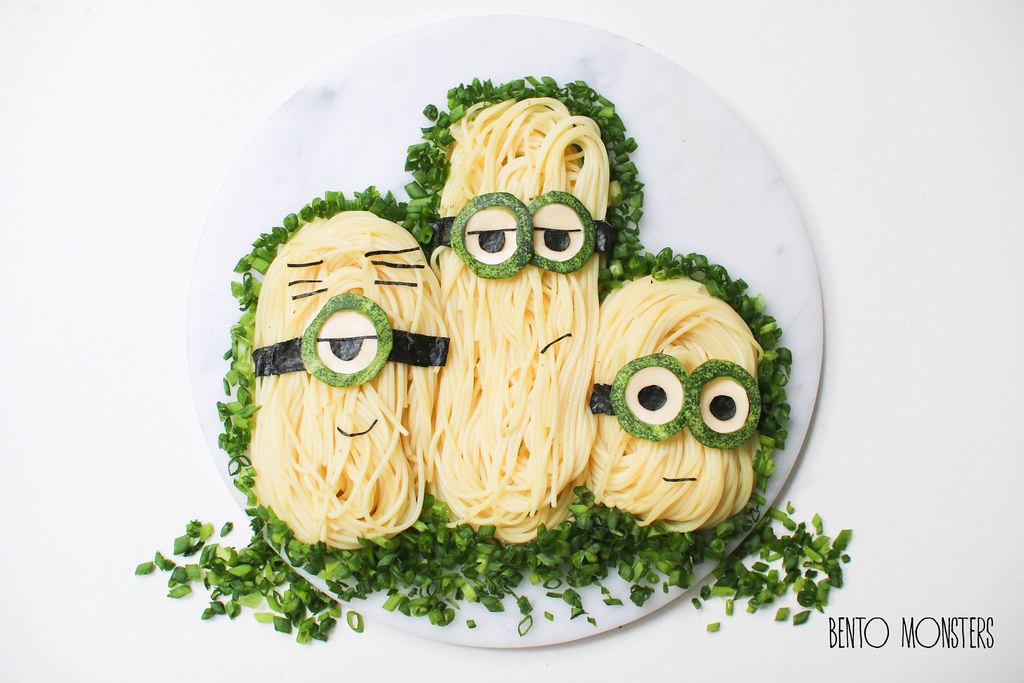
Ingredients used for this were yellow somen noodles, nori, cheese and cucumber. Chopped spring onions are optional but they do complete the whole look and goes well with the cold noodles too.

IMG_5642
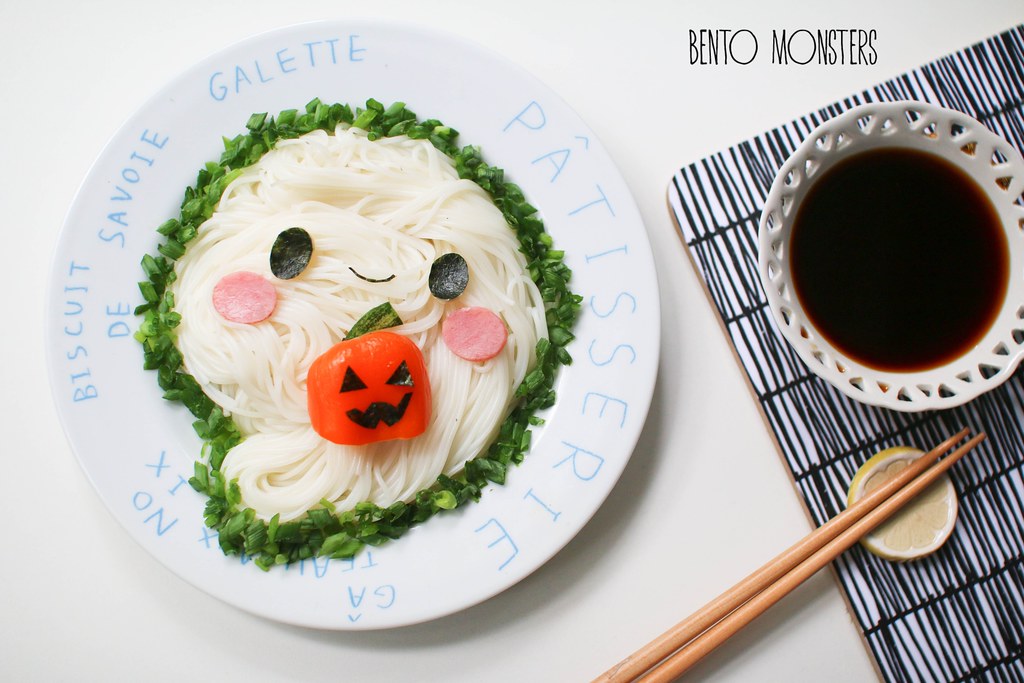
Another Minon food art I made, this one was for myself. This is Minion Bob with his teddy bear.

IMG_5636
Bob was made out of scrambled eggs, cheese, nori and ham. The ham was coloured blue by dipping in butterfly/blue pea water. The teddy bear was made out of toasted bread, I cut it out first before toasting it brown.

IMG_5629
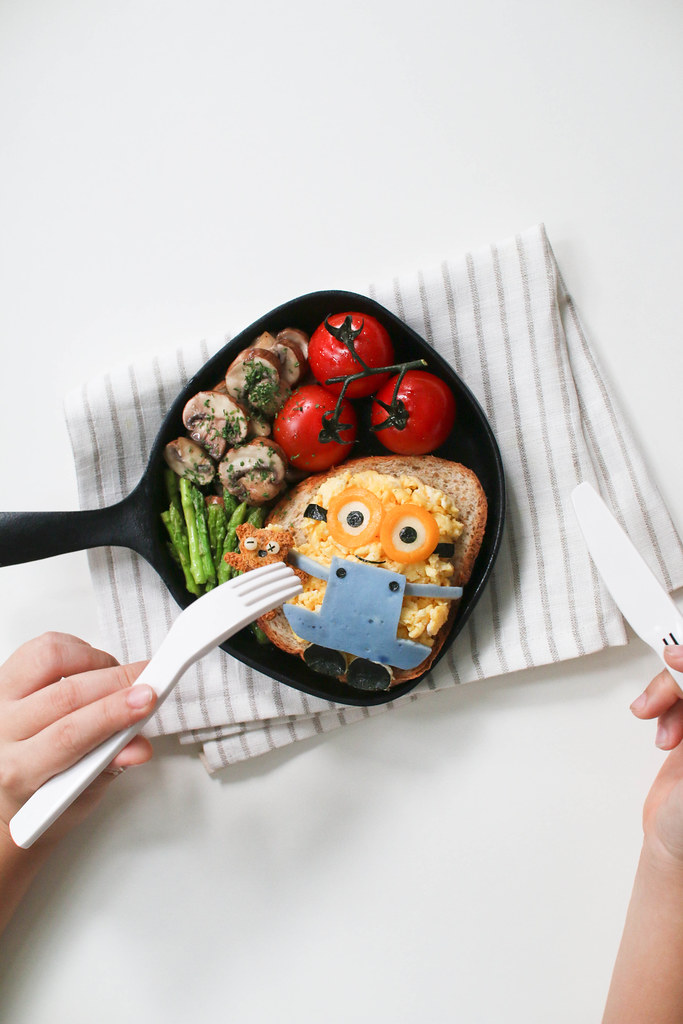
I ate this for lunch, not breakfast though, added in grilled mushrooms, asparagus and tomatoes at the side. :)
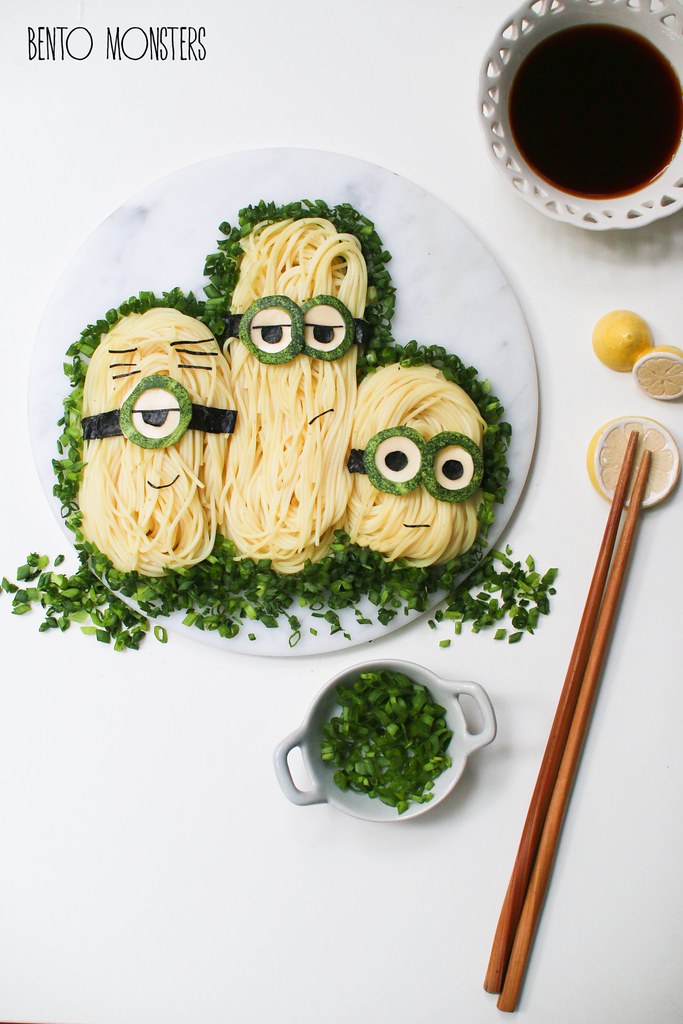
Wednesday 28 October 2015

Halloween Pull-Apart Bread Bun

Before I proceed with the chigiri pan I made for Halloween, I'll like to share about my bento book giveaway over at Just One Cookbook. My friend, Nami has also uploaded a video of how she did one of the recipe in my bento book. Go and check it out. That's not all, if you win, in addition to my cookbook, you can also receive $100 worth of goodies from BentoUSA. Giveaway is open internationally. Good luck!

IMG_7633
This Halloween chigiri pan shall be my last Halloween creation for this year. The Halloween characters I made were Jack(from Nightmare before Christmas), Jack o'lantern, black cat, ghost and Frankenstein.

IMG_7637
Sorry, I don't have any recipe to share for this, I'm still need more trials with making different coloured dough. I used matcha for Frankie and charcoal powder for the black cat. I was out of carrot powder and orange food colouring, so I used a mix of pink and yellow food colouring for the  Jack o'lantern. The colours ended up a little patchy and too vibrant for my liking. I need to get more vegetable powder when I go to Japan during the holiday, they work the best.

IMG_7647
Not sure if you noticed, Jack is slightly browned, because I was a little too late in covering him with aluminium foil. I remembered later for the little ghost, so he's really white, lol.

Monday 26 October 2015

Totoro & Minion Halloween

Another Halloween post to update for today, using characters my boys and I like. I'm planning to make one last Halloween creation this week, and will try to get it up on the blog by friday. Hopefully there'll be no hiccups.

IMG_7441
Totoro cooking up some curry for our dinner, lol. I got the inspiration for this Totoro Halloween food art from a photo of a Totoro Halloween display set I saw online. I simplified the actual display though, cut down to two Totoros and left out some details.

IMG_7444
Totoro was made using rice, mixed with grinded black sesame, cheese and nori. I used fried pasta sticks for the whiskers. Can you spot the pot of butter chicken curry at the back? I cooked that using the premix from Dancing Chef, totally fuss-free and it tasted yummy. :)

IMG_7452
The mini cauldron is totally edible too, the cauldron itself was made using rice and nori, and I added in some butter chicken curry into it as well.

IMG_7590
The other character I made for Halloween was this vampire minion. When I saw this character a few months ago when the movie was just released, the first thought that went to my mind was that it's perfect for Halloween. I immediately noted it down in my list of to-do creations, so I will remember to craft it out nearer to Halloween.

IMG_7589
Minion was made from rice mixed with mashed egg yolks, cheese, nori and red cabbage. His hands are supposed to be purple, but I was lazy to colour another batch of rice purple, hence I just left it as yellow.

IMG_7593
You can't really tell, but he's actually lying on a bed of chicken stir-fried with bell peppers. The other side dishes were broccoli and tamagoyaki. :)

Saturday 24 October 2015

Totoro Pull-Apart Bread Bun

I'm on a roll, two posts in two days. Just joking, it's actually because I'm stuck at home doing revisions with my boys, so I'm taking time to update a post while they are doing their exam papers. I feel like banging my head against the wall sometimes when I do revisions with them, and I still thought I'm done with studying, can't wait for exams to be over.

IMG_6623
Totoro chigiri pan which was the first character design I attempted.  Chigiri refers to pull apart while pan refers to bread. In Japan, these pull-apart bread buns are transformed into adorable characters. If you are not into cute characters, these chigiri pan looks great as sandwich buns too, simply cut a slit on each bun, fill with desired sandwich fillings such as ham, scrambled eggs, lettuce, cucumber and tomato slices.

IMG_6632
This is actually my second batch of Totoro chigiri pan, although most chigiri breads are made into 16 buns, I baked only nine buns in a 20cm square pan for the first few attempts. I only just tried baking them into 16 buns this week, in another design, sneak peek on my Instagram.

IMG_2302
This is my first batch of Totoro chigiri pan, and also my very first attempt at making such bread. It's really fun, can't wait to try many more designs. You might also want to check out another version of Totoro chigiri pan I shared earlier here.

IMG_2306
I used white chocolate of the eyes for this batch, whereas I used marshmallow for the eyes of the other batch. I personally prefer the marshmallow version better.

totoro
I'm using back my trusty bread buns recipe, which I've shared many times on my blog, so this recipe post is more for you to see how I shape the bread.

TOTORO PULL APART BREAD BUN RECIPE

Ingredients:
Bread Dough:
250g bread flour
30g sugar
1/4 tsp salt
25g butter, at room temperature
1 tsp instant yeast
1/2 beaten egg (keep the reminder 1/2 egg for egg wash)
120g water
Icing sugar
Mini marshmallows
Melted chocolate

Method:
  1. Mix all the ingredients, except butter, in a large bowl to get a dough. Add in butter and knead until dough is springy and soft, this takes around 10 minutes. If you have a bread maker, you can just use the dough function for this step, as well as step 2.
  2. IMG_1925
  3. Cover the dough with cling wrap and keep in a warm place for it to rise. This takes around an hour and the dough should double in size. Do a finger test to check if it's ready.
  4. IMG_1792
  5. Take dough out and punch out the air from the dough with your fist. 
  6. IMG_1794
  7. Divide the dough into 10 portions, 9 portions will be used for the Totoro's body and the last portion is used for making all of Totoro's ears. You can weigh them out if you like. I weighed out 9 portions of around 52g and just combine whatever is left for the last portion. Roll them out and form them into balls. Cover with cling wrap and let the dough rest for 15 minutes.
  8. IMG_2283
  9. Roll out the 9 portions, one at a time and form them into balls. Grease the pan and place them in a 20cm square tin. At this point, there will still be space, as the dough will double in size after proofing. Pinch off dough from the last portion and shape into ears for Totoro. Cover with cling wrap and let the dough proof for 40 minutes.
  10. IMG_6611IMG_6612
  11. Brush with egg wash and bake at 180 degrees celcius for around 15 minutes or till they turn golden brown. I did not brush with egg wash for mine.
  12. IMG_6613
  13. After the bread has cooled down, spread on icing sugar for Totoro's tummies. I used a brush to brush on the icing sugar. Using a mini marshmallow, cut off both ends and stick onto the bread. After cutting, the cut side of the marshmallow is sticky and can stick onto the bread. Alternatively, you can also use icing or white chocolate for the eyes and tummies, if you prefer.
  14. IMG_6614IMG_6615
  15. Pipe on the rest of the details using melted chocolate.
  16. IMG_6622

Friday 23 October 2015

Panda & Penguin Sushi

I love making sushi lately, simply cause they are relatively fast to make and I can present them without the side dishes. I've made quite a few so far, and still have ideas in my notes for many more, so you'll be seeing more of them, lol. What I've actually done after taking photos was to cling wrap the sushi, and kept them in a air-tight container in the fridge, so I can pack them for my boys' bentos for school the following day.
   IMG_5705
My favourite has to be these pandas, have ideas for more pandas sushi, will work on them soon. Maybe sushi is not the correct name for them, they are more like onigiri, but their size are small like sushi, whatever, lol.

IMG_5710
They are very easy to make, just using two ingredients - rice and nori.

IMG_5707
I added lightly salted flaked salmon for the fillings. The recipe for the salmon is similar to the salmon soboro recipe here, but I added slightly less salt, as my boys will be dipping the pandas in soy sauce.

IMG_5767
The next sushi I did were these penguins sushi, similar ingredients to the panda, with the addition of carrots.

IMG_5781
My favourite is the one in the middle front row, who looks like he's sliding. >.<

IMG_5784
That's all for today's post, I'm hoping to get two more Halloween creations done next week, and also blog about them before Halloween is here.

Monday 19 October 2015

Halloween Soba & Burger

I'm back with more Halloween creations. I can sleep later today because my boys only have school on friday this week.  However, we have to do exam revisions as their exams will start next week. IT is a lot more independent and quite confident this round (though I've to remind him not to be too complacent), so I'm finally focusing more on guiding LT with his revisions.

IMG_7221
Here's the first set of Halloween food art I'm sharing today. Frankenstein and ghost cold soba. Ghost is actually made out of somen, it's thinner than soba.

IMG_7217
I served them cold with a dipping sauce. It has been a long time since I last cook cold soba for my boys. LT was asking for them the other day, so I decided to serve them some, but not before I decorated them, lol.

IMG_7208
Ingredients used for the ghost were nori, ham, orange bell pepper and cucumber.

IMG_7210
Ingredients used for Frankie were nori, cheese and cucumber.

IMG_7320
Another Halloween food art I made was this Halloween burger set. Had a hiccup with this one, this cucumber Frankenstein was actually a last minute change. I had wanted to make Frankenstein out of spinach soup instead, but I tried a new recipe that day and the soup was not thick  enough, and I had problem placing the ingredients on it.

IMG_7311Jack o'lantern is made using a slice of cheese over a meat patty, you can take a look at this tutorial here, I used the same method to mould the cheese onto the patty. I used a knife to add on some indention on the cheese so it looks more like a pumpkin. And finally, the little ghost is made using quail egg.

Friday 16 October 2015

Hello Kitty Strawberry Yoghurt Tart

I'm updating a strawberry tart recipe for today. Sorry, it took me so long to get this recipe up. I've been trying to sleep early lately as I've extra chauffeuring duties in the morning which needs me to drive onto the highway. Having not enough sleep always makes me feel like sleeping when I'm driving on the highway, so I'm trying to sleep earlier to prevent that from happening. Ended up not having any time left for updating the blog at night.

IMG_4831
Back to the strawberry tart recipe I am going to share. Instead of making the usual strawberry tart, I decorated it into Hello Kitty.

IMG_4832
I used a small tart mould to bake this, somehow I think smaller always looks cuter, lol.

IMG_7171
Here's a slightly bigger version, but still smaller than the usual tart size. This one was made with the help of LT. He loves to help with my food preparation, he enjoyed cutting up and laying out the strawberries for this .

IMG_7183
LT also helped me to fill another tart with raspberry, I ate this one because no one at home like raspberry. The recipe I share called for a glaze but I've left it out as I was out of strawberry jam and forgot to replenish it. It's optional but glazing gives the fruits a nice shiny finish.

hellokittytart
This same recipe can also be used for making a fruit tart, simply use whatever fruits you fancy for the toppings.

HELLO KITTY STRAWBERRY YOGHURT TART RECIPE

Ingredients:
Tart:
125g cake flour
30g almond powder
60g butter, room temperature
50g icing sugar
1 egg yolk

Yoghurt:
250g plain yogurt
200ml whipping cream
60g sugar
20g gelatin powder
4 tbsp water

Topping:
Strawberries
Blueberries
Lemon peel
2 tbsp strawberry jam
2 tsp water

Method:
  1. To make tart, sift together cake flour and almond powder.
  2. Using a whisk, beat butter and sugar till fluffy. 
  3. Mix in the egg yolks, one at a time. Mix well.
  4. Use a spatula to fold in the ingredients form step 1. The mixture will become crumbly.
  5. IMG_7138
  6. Use your hands to bring the mixture together and cling wrap it. Let it chill in the fridge for an hour.
  7. IMG_7139
  8. Roll out dough using a rolling pin
  9. IMG_7141
  10. Butter a tart mould and place on top of the dough .Flip the dough over onto the mould. Use your finger to press the dough into the tart mould.
  11. Cut off excess dough. Poke dough with a fork.
  12. IMG_7140
  13. Line the top of the dough with baking paper, then fill with baking stones. Bake in an oven preheated to 180℃ for 18 minutes.
  14. Remove the stones and bake at 180℃ for another 10 minutes. Leave to cool down.
  15. To prepare the yoghurt filling, start by beating whipping cream with mixer at high speed until peaks form. Set in the chiller.
  16. IMG_4379
  17. In another bowl, add in the plain yogurt and sugar, stir to dissolve.
  18. IMG_7142
  19. Add in the gelatin powder and water in a bowl. Heat in microwave for 15 seconds for gelatine to dissolve.
  20. Fold in the whipped cream into the yogurt mixture and add in the gelatin.
  21. IMG_7144IMG_7146
  22. Pour the mixture into the tart shell. Chill in the fridge for at least an hour.
  23. IMG_7149
  24. Cut out Hello Kitty's eyes and whiskers from blueberries. Cut out her nose from lemon peel.
  25. IMG_7177
  26. Cut out Hello Kitty's bow from strawberry.
  27. IMG_7176
  28. Assemble the cut-outs on top half of the tart. Fill the bottom half of the tart with strawberries. Heat up jam and water over low heat till it become loose, let it cool before brushing onto the fruits.
  29. IMG_4837